Deploying a load-balanced EC2 fleet with CDK
AWS Cloud Development Kit (CDK) is a code framework for deploying apps through AWS CloudFormation. In this article, we’ll see a detailed example of how to deploy a load-balanced EC2 fleet using CDK.
Pre-requisites
Before creating any apps, we need a URL to deploy them to. I have a Route 53 hosted zone for which I’ve pre-generated a single, catch-all SSL certificate. You can generate a new certificate for each application if you prefer.
What we’ll build
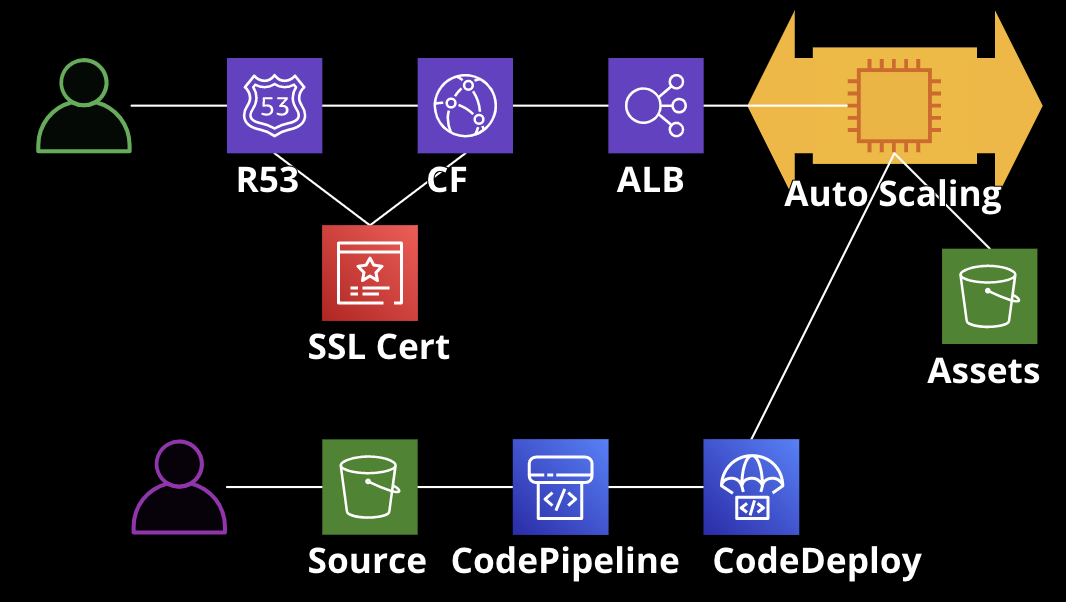
Unlike with a NodejsFunction-based infrastructure, the infrastructure is deployed first, and then code is deployed to the fleet in a separate step.
We will use these resources:
- VPC with public subnets
- Launch template with Security Group
- S3 bucket containing assets
- EC2 autoscaling group
- ApplicationLoadBalancer
- CloudFront distribution for caching
- Route53 A-Record for a domain
- CodePipeline for deploying code
- CodeDeploy for deploying code to the fleet
- Dedicated S3 bucket for storing zipped deployment code
Networking to the fleet
- Route 53 A-Record points to CloudFront
- CloudFront sits in front of an ApplicationLoadBalancer
- ApplicationLoadBalancer sits in front of the EC2 autoscaling group
Deploying code to the fleet
- Zipped source including app-spec and lifecycle scripts is uploaded to S3
- CodePipeline watches the S3 bucket for changes
- When a new source is uploaded, CodePipeline sends the zip file to CodeDeploy
- CodeDeploy deploys the code to the EC2 fleet
Creating the stack
VPC
A VPC is used to isolate the EC2 fleet from the rest of the network. We create a VPC with public subnets.
declare const scope: Construct;
const id = 'MyApp';

return new aws_ec2.Vpc(scope, `${id}_VPC`, {
  ipAddresses: aws_ec2.IpAddresses.cidr('10.0.0.0/16'),
  availabilityZones: ['eu-west-2a', 'eu-west-2b', 'eu-west-2c'],
  subnetConfiguration: [ // no need for private subnets
    {
      subnetType: aws_ec2.SubnetType.PUBLIC,
      name: 'PublicSubnet',
    },
  ],
});
Launch template
The launch template defines the size and OS of each EC2 instance. Our template will also include user data to install node/npm and the CodeDeploy agent. It may be tempting to use user data to also install our code and start the app, but this can be troublesome. Instead, we’ll use CodeDeploy for that (this will come later).
// role that the EC2 instances will use
const role = new aws_iam.Role(scope, `${id}_Ec2FleetRole`, {
  assumedBy: new aws_iam.ServicePrincipal('ec2.amazonaws.com'),
});

// security group to allow traffic into/out of the EC2 instances
const securityGroup = new aws_ec2.SecurityGroup(
  scope,
  `${id}_SecurityGroup`,
  {
    vpc,
  },
);
// allow SSHing into EC2 instances
securityGroup.addIngressRule(
  ec2.Peer.anyIpv4(),
  ec2.Port.tcp(22),
  'SSH',
);
// N.B., does not allow public HTTP traffic to the server on port 3000

// user data for installing node/npm
const installNode = aws_ec2.UserData.forLinux();
// `export HOME=/home/ec2-user` is a line you'll see a lot in this article
installNode.addCommands(`
export HOME=/home/ec2-user
curl -o- https://raw.githubusercontent.com/nvm-sh/nvm/v0.39.3/install.sh | bash
. ~/.nvm/nvm.sh
nvm install 16 # Latest LTS supported by Amazon Linux 2
`);
// user data for installing CodeDeploy agent
const installCodeDeployAgent = aws_ec2.UserData.forLinux();
installCodeDeployAgent.addCommands(`
export HOME=/home/ec2-user
sudo yum -y install ruby
sudo yum -y install wget
cd /home/ec2-user
wget https://aws-codedeploy-eu-west-2.s3.eu-west-2.amazonaws.com/latest/install
sudo chmod +x ./install
sudo ./install auto
`);
// combine user data
const userData = new aws_ec2.MultipartUserData();
userData.addPart(aws_ec2.MultipartBody.fromUserData(installNode));
userData.addPart(aws_ec2.MultipartBody.fromUserData(installCodeDeployAgent));

// launch template itself
const launchTemplate = new aws_ec2.LaunchTemplate(
  scope,
  `${id}_LaunchTemplate`,
  {
    machineImage: aws_ec2.MachineImage.latestAmazonLinux2(), // latest linux 2
    instanceType: aws_ec2.InstanceType.of( // smallest instance type
      aws_ec2.InstanceClass.T2,
      aws_ec2.InstanceSize.NANO,
    ),
    // use default SSH key
    keyName: 'Default',
    role,
    securityGroup,
    userData,
  },
);
S3 buckets
We will create two S3 buckets. The first will contain assets for the app, such as images, CSS, and JS. The second will contain zipped source code for deploying to the fleet.
// can be hard-coded or a prop when creating the stack
const sources = [aws_s3_deployment.Source.asset('./bucket')];

const assetBucket = new aws_s3.Bucket(context, `${id}_S3_Assets`, {
  bucketName: `${appDomainName}.assets`,
  blockPublicAccess: aws_s3.BlockPublicAccess.BLOCK_ALL,
  enforceSSL: true,
  removalPolicy: RemovalPolicy.DESTROY,
  autoDeleteObjects: true,
});

// asset bucket uses auto-deployment to sync a folder of assets directly
const assetDeployment = new aws_s3_deployment.BucketDeployment(
  context,
  `${id}_s3_AssetDeployment`,
  {
    destinationBucket: bucket,
    sources,
    prune: false,
  },
);

const sourceBucket = new aws_s3.Bucket(scope, `${id}_S3_Launch`, {
  bucketName: `${appDomainName}.source`,
  blockPublicAccess: aws_s3.BlockPublicAccess.BLOCK_ALL,
  enforceSSL: true,
  removalPolicy: RemovalPolicy.DESTROY,
  autoDeleteObjects: true,
  versioned: true,
});

// The source bucket gets a CloudWatch trail to watch for changes to the source archive
const trail = new aws_cloudtrail.Trail(
  scope,
  `${id}_SourceArchive_CloudTrail`,
);
trail.addS3EventSelector(
  [
    {
      bucket: sourceBucket,
      objectPrefix: 'source.zip', // needs to match the key defined in CodePipeline
    },
  ],
  {
    readWriteType: aws_cloudtrail.ReadWriteType.WRITE_ONLY,
  },
);

// Give the EC2 fleet read/write access to the asset bucket
role.addToPrincipalPolicy(
  new aws_iam.PolicyStatement({
    actions: ['s3:GetObject', 's3:PutObject'],
    resources: [`${assetBucket.bucketArn}/*`],
  }),
);
role.addToPrincipalPolicy(
  new aws_iam.PolicyStatement({
    actions: ['s3:ListBucket'],
    resources: [assetBucket.bucketArn],
  }),
);

// Give the EC2 fleet read access to the source bucket
role.addToPrincipalPolicy(
  new aws_iam.PolicyStatement({
    actions: ['s3:GetObject'],
    resources: [`${sourceBucket.bucketArn}/*`],
  }),
);
EC2 Auto-Scaling Fleet
The EC2 fleet is an auto-scaling group. This means that the number of EC2 instances will scale up and down based on the load on the fleet. For the example, we will use a scheduled scaling policy. This means that the number of instances will scale up and down based on the time of day.
// create the group itself using the vpc and launch template
const autoScalingGroup = new aws_autoscaling.AutoScalingGroup(
  scope,
  `${id}_AutoscalingGroup`,
  {
    vpc, // launch EC2 instances into the VPC
    launchTemplate, // how to create the EC2 instances
    autoScalingGroupName,
    minCapacity: 3, // should be at least as many AZs as you're using
    maxCapacity: 4,
  },
);

// some sample scaling rules
autoScalingGroup.scaleOnSchedule('ScaleUpInMorning', {
  schedule: aws_autoscaling.Schedule.cron({ hour: '10', minute: '0' }), // UTC time
  minCapacity: 4,
  maxCapacity: 4,
});

autoScalingGroup.scaleOnSchedule('ScaleDownAtNight', {
  schedule: aws_autoscaling.Schedule.cron({ hour: '18', minute: '0' }), // UTC time
  minCapacity: 3,
  maxCapacity: 3,
});
Application Load Balancer
The application load balancer allows us to route traffic to the EC2 instances.
const applicationLoadBalancer = new aws_elasticloadbalancingv2.ApplicationLoadBalancer(
  scope,
  `${id}_LoadBalancer`,
  {
    vpc,
    internetFacing: true,
  },
);
const listener = applicationLoadBalancer.addListener(
  `${id}_ALB_Listener`,
  {
    port: 80, // listen on port 80, not using https
    open: true,
  },
);
// the load balancer target group will automatically update the security group to allow
// only itself to access the chosen port (public access is blocked).
const loadBalancerTargetGroup = listener.addTargets(`${id}_Ec2Fleet`, {
  port: 3000, // we will run our application on port 3000
  targets,
  protocol: aws_elasticloadbalancingv2.ApplicationProtocol.HTTP,
  deregistrationDelay: Duration.seconds(10),
  healthCheck: {
    interval: Duration.seconds(10),
    healthyThresholdCount: 2,
  },
});
CodeDeploy
CodeDeploy allows us to configure how the application is deployed to the EC2 instances. It will load the source code provided via CodePipeline and start the application.
const application = new aws_codedeploy.ServerApplication(
  scope,
  `${id}_CodeDeployApplication`,
  {
    applicationName,
  },
);
const deploymentGroup = new aws_codedeploy.ServerDeploymentGroup(
  scope,
  `${id}_DeploymentGroup`,
  {
    application,
    deploymentGroupName: `${stackName}_${id}_DeploymentGroup`,
    autoScalingGroups: [autoScalingGroup],
    installAgent: false, // we installed the agent manually with user data
    loadBalancer: aws_codedeploy.LoadBalancer.application(
      loadBalancerTargetGroup,
    ),
    // encourages uptime while still deploying relatively quickly
    deploymentConfig: aws_codedeploy.ServerDeploymentConfig.HALF_AT_A_TIME,
  },
);
CodePipeline
To know what to deploy, CodeDeploy needs either be invoked manually, or it needs to be provided with a source from CodePipeline. CodePipeline will watch the source bucket for changes to the source code archive using CloudTrail.
const source = new codepipeline.Artifact();
const codePipeline = new aws_codepipeline.Pipeline(scope, `${id}_Pipeline`, {
  stages: [
    {
      stageName: 'GetSource',
      actions: [
        new aws_codepipeline_actions.S3SourceAction({
          actionName: 'S3Source',
          bucket: sourceBucket,
          bucketKey: 'source.zip', // needs to match the CloudTrail key
          output: source,
          // uses the CloudTrail trail we created earlier to watch for changes
          trigger: aws_codepipeline_actions.S3Trigger.EVENTS,
        }),
      ],
    },
    {
      stageName: 'Deploy',
      actions: [
        new aws_codepipeline_actions.CodeDeployServerDeployAction({
          actionName: 'CodeDeploy',
          input: source,
          deploymentGroup,
        }),
      ],
    },
  ],
});
CloudFront
CloudFront will be the final piece before Route53. It will allow us to use a custom domain name and SSL certificate. It will also cache the application to reduce the load on the EC2 fleet.
const origin = new aws_cloudfront_origins.LoadBalancerV2Origin(applicationLoadBalancer, {
   // load balancer uses HTTP, not HTTPS
  protocolPolicy: aws_cloudfront.OriginProtocolPolicy.HTTP_ONLY,
})

// Pre-created certificate mentioned earlier, or you can create one
declare const certificateArn: string;

const distribution = new aws_cloudfront.Distribution(
  scope,
  `${id}_Cloudfront`,
  {
    comment: `${stackName} ${id} cache behaviour`,
    defaultBehavior: {
      origin,
      allowedMethods: aws_cloudfront.AllowedMethods.ALLOW_ALL,
      cachePolicy: new aws_cloudfront.CachePolicy(
        scope,
        `${id}_CachePolicy`,
        {
          defaultTtl: Duration.seconds(10), // adjust to your needs
          minTtl: Duration.seconds(0),
          maxTtl: Duration.hours(1),
        },
      ),
    },
    domainNames: [appDomainName],
    certificate: aws_certificatemanager.Certificate.fromCertificateArn(
      scope,
      `${id}_CloudFront_CertificateReference`,
      certificateArn,
    ),
  },
);
Route53
Now we will add the DNS records to Route53. This will allow us to use the custom domain name with the application.
declare const hostedZoneId: string;
declare const zoneName: string;

new route53.ARecord(scope, `${id}_ARecord`, {
  zone: route53.HostedZone.fromHostedZoneAttributes(
    scope,
    `${id}_HostedZoneReference`,
    {
      hostedZoneId,
      zoneName,
    },
  ),
  recordName,
  target: route53.RecordTarget.fromAlias(
    new route53Targets.CloudFrontTarget(distribution),
  ),
})
Releasing code
Now that we have the infrastructure in place, we need to deploy code to our fleet. We will zip a source bundle up with an appspec.yml file and some bash scripts for starting and stopping the server.
Contents of source archive:
/source
├── .env
├── appspec.yml
├── server.js
├── start-server.sh
└── stop-server.sh
appspec.yml
version: 0.0
os: linux
hooks:
  ApplicationStop:
    - location: ./stop-server.sh
      timeout: 300
      runas: root
  ApplicationStart:
    - location: ./start-server.sh
      timeout: 300
      runas: root
start-server
#!/bin/bash

export HOME=/home/ec2-user
source ~/.bashrc

# run the server from the correct directory
parent_path=$( cd "$(dirname "${BASH_SOURCE[0]}")" ; pwd -P )
cd "$parent_path"

# use pm2 to manage server processes
npm i pm2 -g

# load environment variables from .env file
export $(cat ./.env | xargs)

pm2 start ./server.js --name server
stop-server
#!/bin/bash

export HOME=/home/ec2-user
source ~/.bashrc

pm2 stop server
.env and server.js
The .env file should be populated with the environment variables needed to run the application.
server.js can either be a bundle, or you can have multiple javascript files that require each other. Because I’m using TypeScript, I tend to favour bundling the code using esbuild.
Release script
Your build/release script should assemble the correct files into a folder, archive it as a zip file, and upload it to the source bucket as source.zip (or whatever you specified).
#!/bin/bash

npm run build:server # bundle server file

# copy files to source folder
cp ./dist/server.js ./ec2-fleet-source/server.js
cp ./infra/assets/.env ./ec2-fleet-source/.env
cp ./infra/assets/appspec.yml ./ec2-fleet-source/appspec.yml
cp ./infra/assets/start-server.sh ./ec2-fleet-source/start-server.sh
cp ./infra/assets/stop-server.sh ./ec2-fleet-source/stop-server.sh
zip -r ./ec2-fleet-source/source.zip ./ec2-fleet-source

# upload source archive and trigger CodePipeline/CodeDeploy
aws s3api put-object --bucket jackbliss.co.uk.source --key source.zip --body ./ec2-fleet-source/source.zip
Limitations
The load balancer uses only HTTP, not HTTPS. You can configure ALB to use HTTPS, but note that the certificate region must be the same as the ALB region. This means that you will need to create a certificate in the same region as your ALB. Your CloudFront certificate must be in the us-east-1 region.
You can also configure the ALB to only accept traffic from CloudFront in a variety of ways, for example with a custom header or by IP address.
There is also the issue of logging - currently, all console logs will be emitted to the EC2 instance that logged them, and nowhere else. Instead, you could create a CloudWatch log group, or an SNS topic, and send logs there.